About a year ago I started to play guitar again. At that time I got myself a nice black Squier Deluxe Strat (named “Black Bess” by me), which is actually a good guitar for a very reasonable price.
 Of course, once you start with this, you also begin to have an eye on other types of electric guitars. Maybe a Telecaster as second guitar? Or a Les Paul? A semi-acoustic would also be nice…
Finally I bumped into a guitar builder forum and warmed up to the idea to actually try and build a guitar myself. Not a complete guitar build – that would be too much trouble without a proper, fully equipped workshop – but from a guitar build set. That would still leave enough challenges and learning opportunities to begin with.
Acknowledgements
First of all, I would like to thank the people from the Gearbuilder forum for their help, support and encouragement. Without them, I would have never even dared to try my hands on such a project, let alone bring it to the finishing line. This is also where the build has been discussed while I was working on it.
But also other forums have been very helpful – mostly be answers to my questions already answered because somebody else asked them before. In particular, I would like to mention GitarreBassBau and the Musiker-Board Forum (both in German).
There is also a wealth of information out there on YouTube, including this video which inspired me to the ink-based staining method I used on the guitar.
Last but not least I would like to thank my family who had to endure all of this noise, dust and mess in the living room. But, hey, wasn’t it worth it?
Ordering from China
There are numerous different guitar builder sets available from music stores and specialized retailers. However, the set that looked most promising to me was a “PRS Style Unfinished Electric Guitar Builder Kit” directly from China.
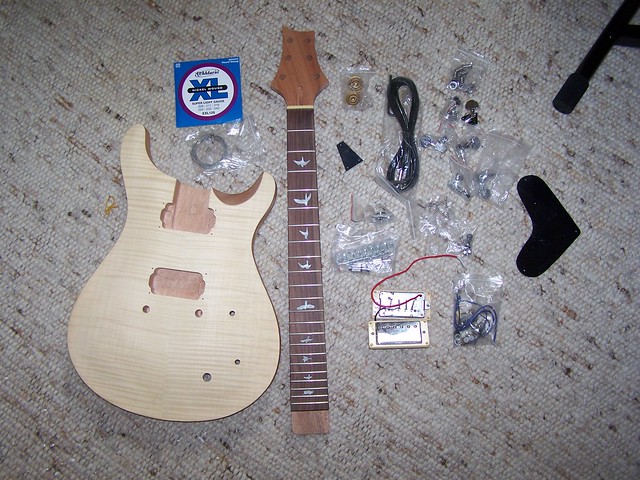
It was not cheap (with shipping and customs ca. 180 Euro – double the price of a cheap Strat kit from a local retailer) and the shipping time seemed to be just a bit short of “forever”. That was mostly because the local customs didn’t believe the shipping documents which stated it was a “gift” and asked me to provide documentation…. but after a little less than 6 weeks (!) I could finally pay the custom duties, bring the box home and unpack it. This is what I found:
Also to be considered: most Chinese sellers pack their shipments in a way that seems exaggerated even for sending raw eggs around the planet. The packaging for this guitar set actually was sufficient to fill up a complete garbage can. I had to bring it down at night so the neighbours don’t see where this comes from… but at least the guitar parts arrived unharmed.
Quality
The quality of the wooden parts was OK but not luxurious. The body hat a good shape, the maple veneer was well set and had a nice flame structure.
The neck was straight and the frets only needed minor touch-ups. As I found out later, the neck also fitted almost perfectly into the cavity and sat there, after glueing, at pretty much the right angle.
There were a few issues that I’m pretty sure, PRS would never let go through even with their (cheaper) “SE” series: at the bottom side, a gap between the veneer and the massive body was simply filled up with wood lime, the wood structure at the headstock was going diagonally and the veneer was a bit irregularly structured. Oh, and the cavity for housing the electrical parts was very, very messy.
When compared to the price I paid, however, these were all rather minor issues.
As for the hardware – well, this is probably where money was saved: the tuners were wobbly (I replaced them with locking tuners, also ordered from China), the bridge was OK, but in the end in the wrong colour (also replaced) and the pickups were, well, a bit dull in the end (you guessed it: they were or will be replaced).
There was also a set of cheap guitar strings included and a rather thin guitar cable. Both were used for testing, and for that they are OK. I also got a “bonus” set of D’Addario guitar strings (or so it says on the package), but I didn’t test these yet.
All in all, the quality of the product was acceptable for the price. I’ve seen much worse guitar parts (much better ones, too)
Sandpapering
Just in case you ever want to try to do something similar, be warned that at least 90% of the workload is actually sandpapering. In fact, it is probably 95% or even more…
And, yes, sandpapering is a boring and tedious job. But it makes the difference between making a cheap guitar or making a cheap looking guitar. You don’t want your guitar to look cheap, do you?
With that in mind, first thing to do is get yourself some quality sanding paper. Firstly because it is easier to work with good tools, but secondly, for the amount of sandpapering you are going to do over the next few weeks, the expensive paper is actually going to be cheaper, because you will need a lot less of it.
I’m serious. Sandpaper is one of these things where quality can vary a lot. The branded sandpaper may cost double or triple the money than the no-name paper next to it, but it will stand at least four or five times as long. And it will be less frustrating to work with.
Make sure you have at least a pack (ca. 4–5 sheets) of each: 120, 240, 400 and 800 grain sanding papers. If you find higher grains (>1000), buy some these, too. Make sure that all of these are suitable for wet sanding, as this is what you are going to do.
I also bought a set of high-quality linen-based sanding sheets (in German: “Schleifleinen”, go find them on eBay) with grains 1200, 2400, 4000, 8000 and 12000 (yeah, the last one is a bit exagerated) and a sanding block (ca. 1000 grain) from the car accessories department. And while you’re there, also buy a polishing leather.
Finally, I used a pack of cotton pads as you would get them from the pharmacy or drugstore (in the pharmacy, ask for the cheaper, non-sterile ones). They are good for all kind of things, like for painting, instead of a brush, or for polishing the finish. And while you are at the drugstore, a pack of disposable rubber gloves will come in handy soon enough. And plasters. Actually, buy loads of plasters!
With all of this in place, let’s start with the sandpapering: First give the entire guitar body a good scrub with the 120 paper. Then water it well (i.e. don’t dip it into the water, just use a brush or cotton pad to wet it from all sides) and you will see that the smooth surface is now all roughened up again. Sandpaper it again and then water it once more. Repeat this until watering the wood won’t roughen it up any more, then move on to 240 grain and it’s the same procedure all over again… and then the same with 400.
And if you think you can cut corners with an electric sanding machine – such a device is very useful for flat surfaces, like the back of the guitar and at some models even for the front, but most of the tricky parts are not flat and the machine will not be a great help there.
Staining
The plan was to stain the front of the guitar blue – in a rather unorthodox way: by using stamp ink (indeed the stuff you use for stamping). Such ink is fade-proof, easy to handle, (relatively) cheap, and it yields a very nice, very intense colour.
If you are shopping for ink, please make sure that the product is water-based (or at least “not oil based”) and non-fading (de: “Dokumentecht”). I decided to use “Pelikan Stamp Ink without Oil”, but other brands may work just as well.
Before you even think about opening any colour container, make sure you mask every little bit you don’t want to stain right now. Don’t take shortcuts here or you will regret it later on…
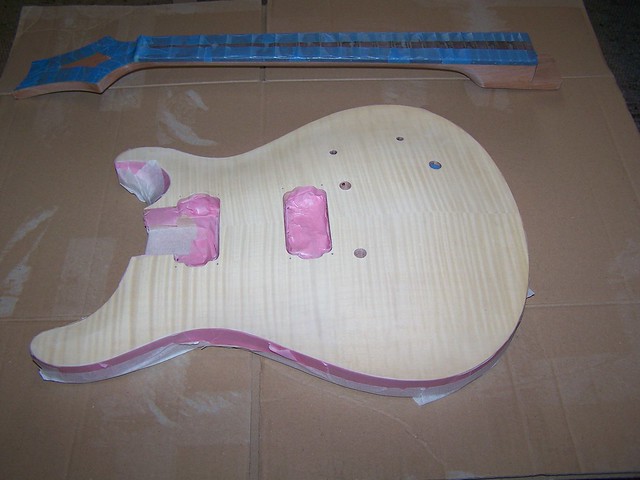
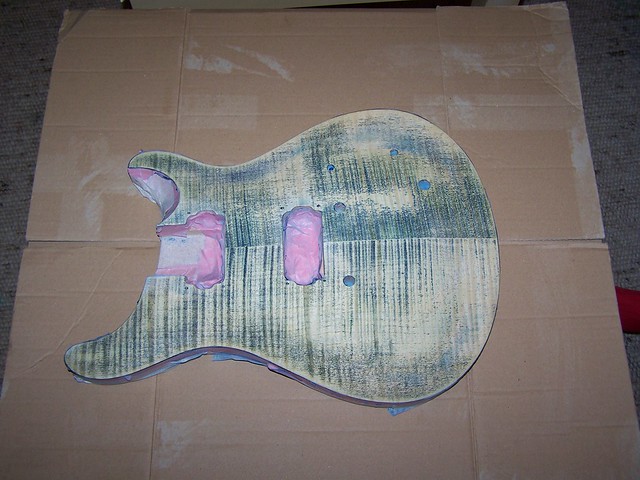
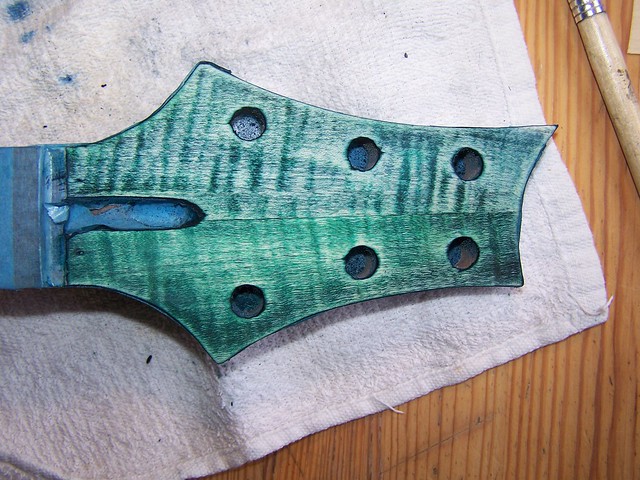
So the first step was to use some black ink to “deepen” the flame structure on the body. First attempt was with black ink mixed with water. It looked like this:

After sandpapering it down again, this was the result:
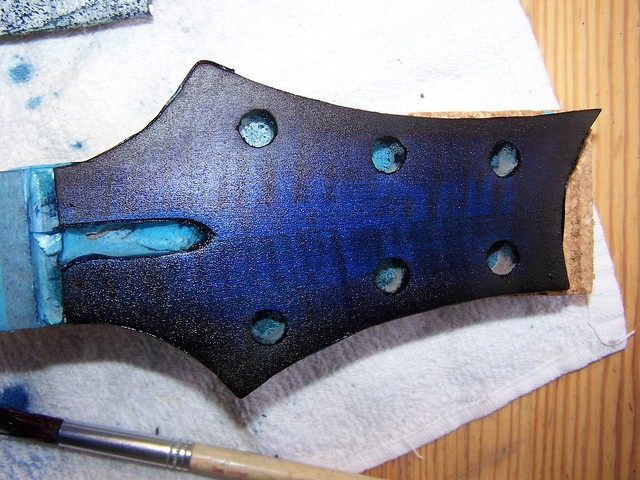
This is already a good start, but not as good as I liked it to be. Firstly, the flame structure wasn’t coming out as nicely as I thought it should be, secondly, the black ink actually turns into kind of blue (with a hint of green). I really needed some proper black … so after drying the guitar I gave it another try: turning this axe black as night by painting it with pure black ink:
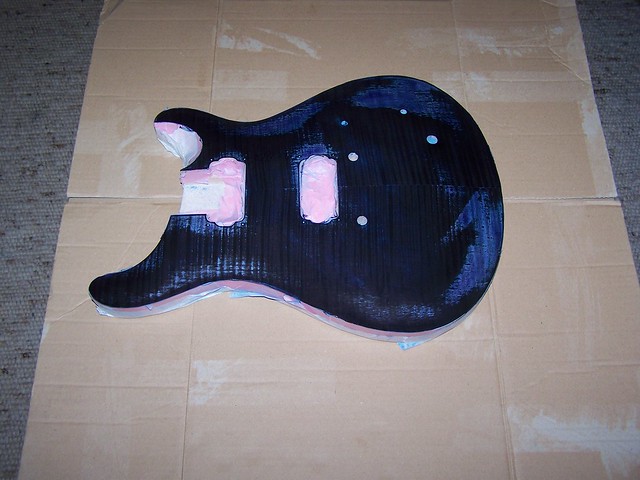
This looks a lot more promising – but as you can see, there are some spots where the ink doesn’t seem to hold very well on the wood. I should have seen this as a warning, but I was too keen to move on, so I just ignored it (bad mistake, I know. That’s just the kind of thing that usually falls on you feet later on…)
Next, I sandpapered the blackness back off again; just so much that only the dye that seeped into the wood structures was left behind:
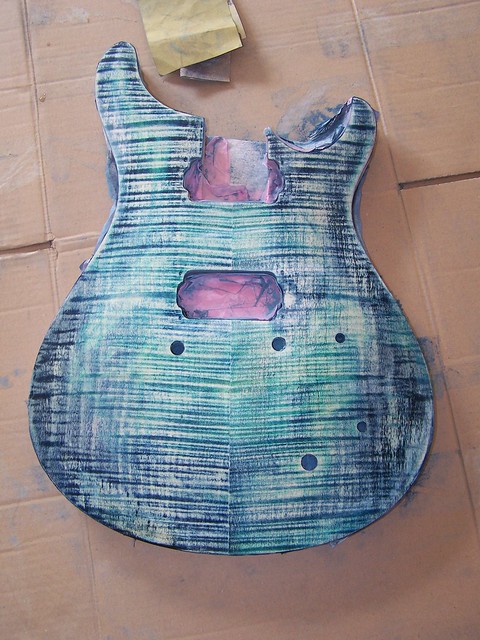
This sounds easy and simple, but it required a few rounds of re-tinting and re-sandpapering to get it somewhat even.The trouble spots were actually exactly the ones where the black ink didn’t want to hold. Most likely, there was a bit of oil in the wood at these places and that effectively blocked the ink from entering the wood structure.
It only got better once I started to treat the trouble spots with a bit of rinsing liquid (read: soap) to remove the grease.
Actually, I spent about a week (spanning two weekends) with this step, so please keep in mind that nothing will go fast here.
Only when the black stain structure was somewhat even, I could continue with the next step: blueing the body.
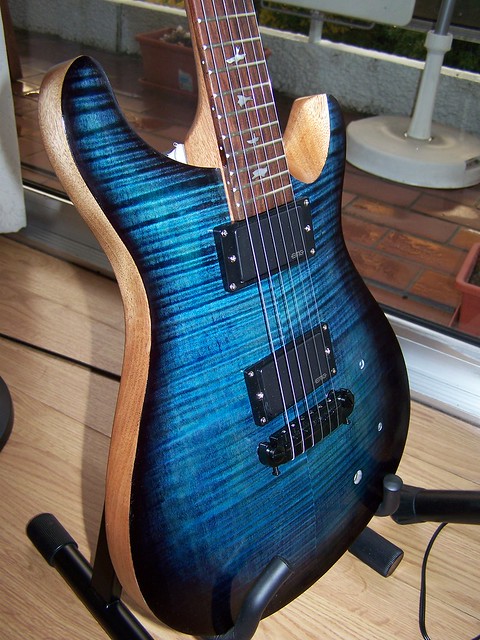
The trick here is to first paint the whole area equally blue, and then add some pure black ink onto the still fresh blue dye to create the burst. Then use some cloth to create a smooth gradient between the blue and the more black-ish rim. Something like this:
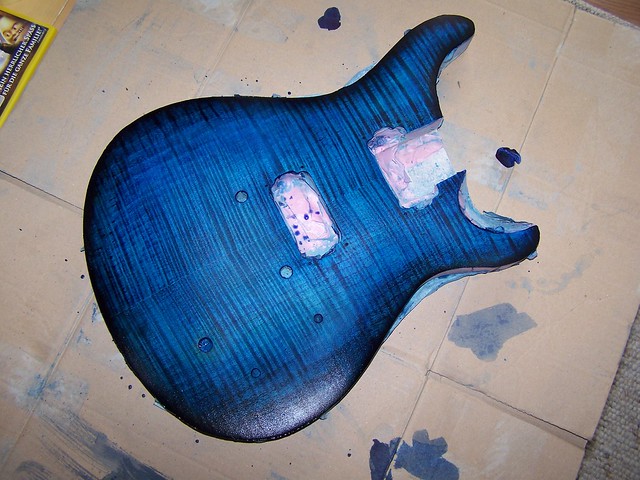
Also, don’t be mistaken by the beautiful colours: this is still fresh and wet ink. Once the ink is dried, the colours will look much duller than that (but later on, after several layers of oil the colour will be back…)
Oiling
There are different ways to get a smooth finish. You can cover everything in varnish or cook your own mixture of linseed oil. I decided to use a ready-made product that goes with the name “TruOil”, effectively a mixture of linseed oil with silica originally intended for gunstock finishing but actually quite popular with the guitar builder community as well.
Unfortunately, TruOil is relatively difficult to get in Europe, but once again, eBay is your friend. Just keep in mind that shipping may take a little while if you are ordering from overseas.
Before you start oiling, give the body a few days to completely dry; and by the time the paint is completely dried you probably wonder where the beautiful blue colour has gone – no worries, it will be back soon.
The manufacturer recommends to apply TruOil with your bare finger. After trying (and failing) to find a better solution, this is also what I recommend.
Actually, I found the best way to apply the oil is as follows: for the first layer, spread some oil generously onto the wood and rub it in with your finger. Make sure the wood is really saturated with oil. Then use some cotton pads to remove the excess oil.
Let it dry overnight, then add a thin layer of oil with your finger again, let it dry for a bit (ca. 1 h) and then rub it with a cotton pad again and let it dry for at least 3 or 4 hours.
Repeat the last step a few times to build up a few (at least 5) thin layers of polymerized oil.
I know, this is rather tedious and annoying, especially as that stuff is incredibly sticky and does not wash off your fingers easily, but all other methods I tried were even worse.
The biggest mistake you can make here is to be impatient and apply too thick layers at once. The only thing you will achieve by pushing it is that you will spoil the surface and you will have to sandpaper it all down again (that’s what happened with the head later, see below) More thin layers are better than a few thick ones, trust me.
Also to watch out for: some cotton pads tend to leave behind little fibres that will then dry into the oil. If you see any cotton fibres left behind, make sure to remove them carefully.
After the final layer of oil has dried for a day, I used some fine sandpaper (800) to smooth out any rough places, but of course not so much that the entire layer is removed again (that can go fast!) before applying the next layer
Then we go wet: add a few drops of water to the surface and use some new 800 grit sandpaper. Then move on to 1200, etc., all the way to 8000 (or even 12000, if you like). Just make sure there is always a bit of water, and please remove any residue from the surface before moving on to a finer grit (leave it on during sanding, though, as it helps in the process.
Once you finished, use the leather to rub it once more. We are almost there now… finally add a few drops of the conditioner and rub it with the cotton pads. The surface was so smooth after this that I couldn’t place anything on it any more – everything would immediately slide down, even though the angle is actually rather flat…
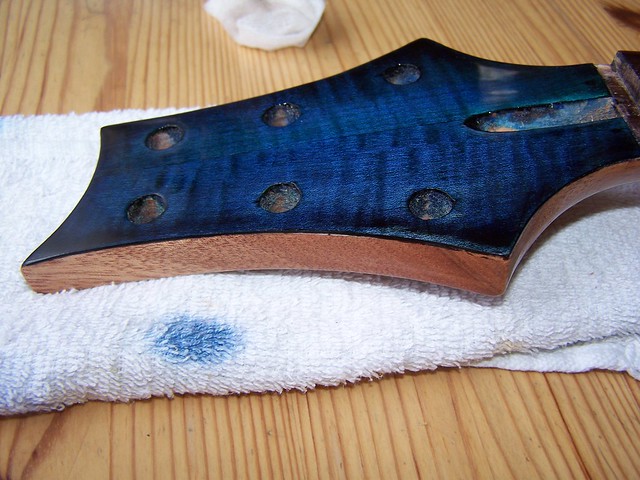
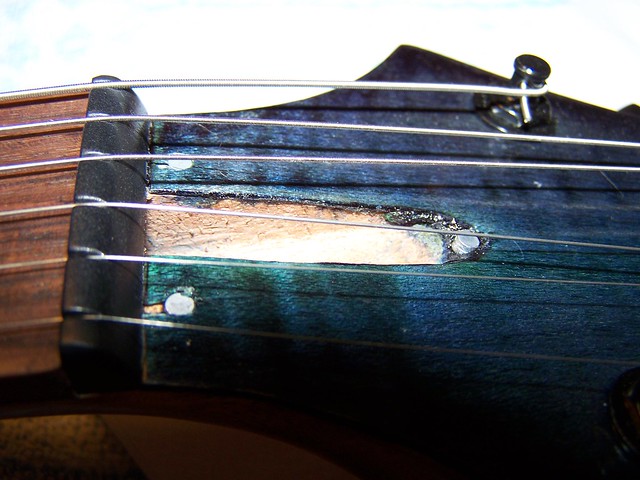
The last step (for the front) is to remove the masking tapes and then sandpaper the sides again to remove any dye that seeped underneath the tape and to get a nice sharp edge. Just look at this here:
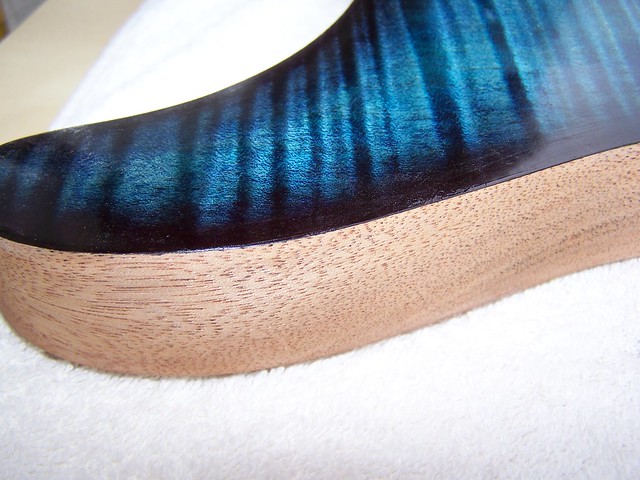
What you can’t see on the picture: on some places there was a very thin bright line visible underneath the tinted front side. It was either a bit of the maple veneer that wasn’t dyed, or even the lime from underneath it which didn’t take any colour at all.
This was easily fixed, though: a permanent marker (otherwise used for writing on CD-Rs) did the trick.
I will spare you a detailed description of all my different attempts to make the back of the body look good. In the end, I had to sandpaper (with the help of a machine) everything down again and I settled for a simple TruOil finish and that’s it.
Neck and Head
Work on the neck started, of course, with a lot of sandpapering. Since the wood already seemed to be reasonably smooth I directly started with 800 grit. This includes the fretboard, i.e. between the frets, but not the part that will later be glued to the body.
The back of both the neck and the head have again been treated with TruOil for several layers, but not with the last, shiny surface as the front of the body. In addition, I have sandpapered the back of the neck with 800 grid again to get a bit of this dull roughness there that is just more pleasant to handle than high gloss.
The fretboard has been oiled with a non-polymerizing oil. The usual choices are either lemon or olive oil: the first has a very unpleasant smell and the other just happened to be in the house, so the choice was not very difficult. After rubbing the oil in the fretboard looks like this:

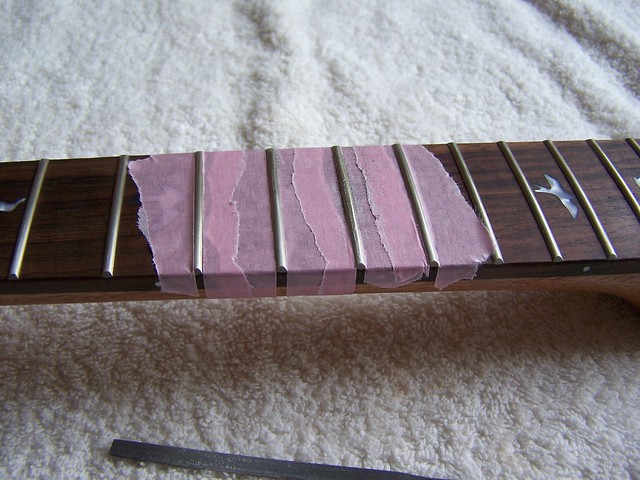
While I’m at the fretboard, I could also do the necessary touch-ups to the frets. Carefully checking the height of each fret on both ends (use something like a credit card over three frets to see if is any unevenness) I found that the frets 10, 11 and 20 need some work.
First mask off the fretboard around these frets to protect the wood:
Then I used a needle file to carefully (!) lower the parts of the frets that were too high. Afterwards sandpapering, polishing … you know the procedure… actually the frets were so nice and shiny after this treatment that I decided to polish all the frets this way.
After I removed the masking tape I noticed the wood seemed to have lost much of the oil that was previously applied, so I simply oiled the fretboard once again. It’s actually a rather meditative task…
Trosrod-cover with inlay
Time to get a bit more creative: Since the guitar now has got a name, “Blue Jay”, I wanted to decorate the truss-rod cover with a small mother-of-pearl inlay in the shape of a bird.
A piece of mother-of-pearl was quickly found, and after just a few hours of sanding, filing, more filing and even more filing I managed to remove all the parts that didn’t look like a blue jay:
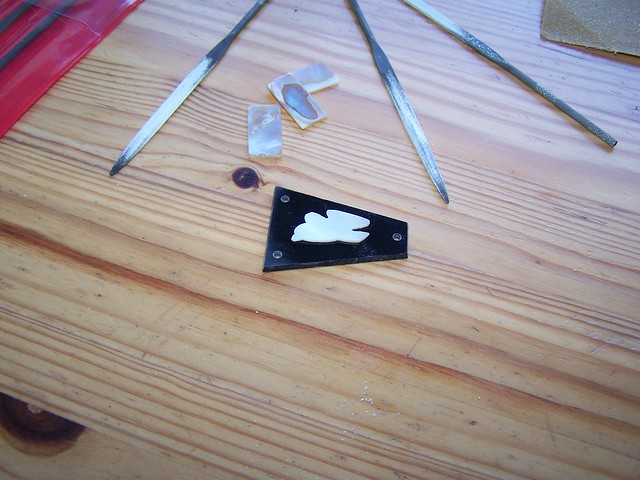
The set of needle files turned out to be quite useful, by the way, for all kinds of tasks.
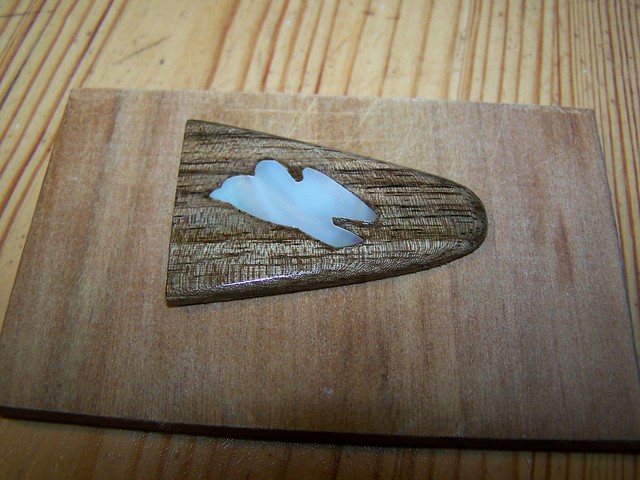
The black plastic thingie in the picture above is the trussrod cover that was included in the guitar set, by the way. Needless to say: I didn’t like it very much. A piece of walnut wood was quickly brought into shape, and the space for the inlay was also prepared, though not quite so quickly:
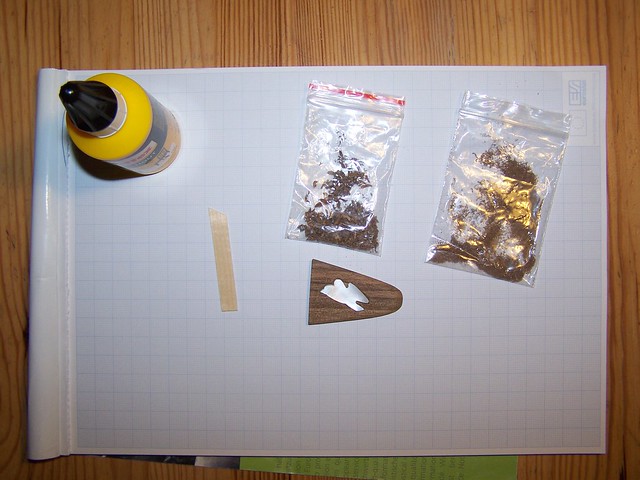
The two plastic bags contain sawdust from cutting the piece (right) and flakes from hollowing out the place for the mother-of-pearl inlay (left). A mixture of wood lime with the sawdust was used to fill the gaps between the inlay and the rest of the wood. I also used the lime to fix the inlay in place, but if I’d do it again, I rather use epoxy resin for this.
This is actually the very first inlay I’ve ever made, woohoo!
Just add a few layers of oil, and it starts to look quite good. Not perfect, but good.
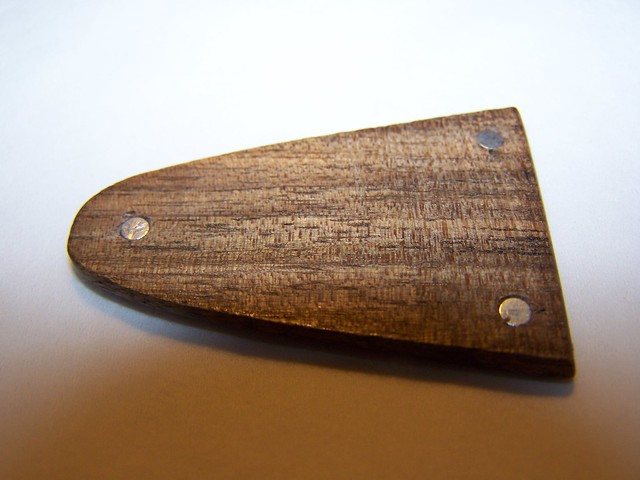
On the backside, I placed a few magnets (!) which will later hold it in place (read on to see how this works)
Headstock
As shown in the first picture, the headstock has an unbalanced, diagonal wood structure – not how I’d like it to be. Actually, after the framed maple body turned out so beautifully I wanted the head to look exactly the same.
After the experience with staining the back of the guitar it was clear that this would not work with the mahogany headstock – time to try my luck with veneer.
The first step was to cut out a mask, roughly in the shape of the head, to find the part of the veneer with the most suitable pattern:
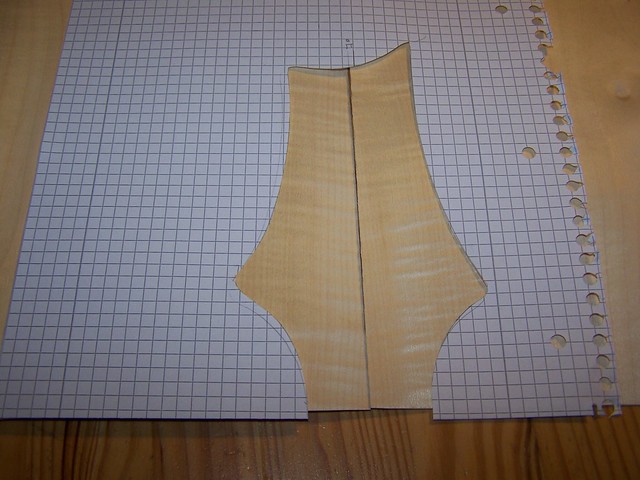
Then cut out the veneer according to the mask – add about 5 mm on all sides to allow for some adjustments later.
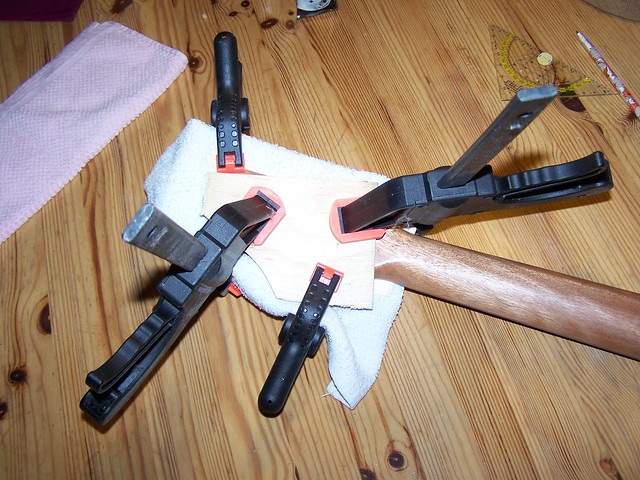
The really tricky part is to get this veneer attached to the right place. The trick here was to use a two parts pressing plate: first attach it to the lower half of the headstock, but make sure you have access to the top part to adjust the location if necessary. Only then add the second half and clamp it all with as much force as possible:
After 24 hours, it is time to remove the vices and clean up: cut the excess, drill out the holes and free the trusrod channel. I have found good nail scissors to be of good use here.
I don’t have a picture of the “plain” veneered head, but here is one after the first layer of (black) ink and some sanding:
In fact, the procedure is the same as for the body. Add some blue colour:
and after a few layers of TruOil (and lots of sanding) the whole thing starts to look as it should:
OK, that actually sounds easier than it really was. In reality, I made some mistake with the oil: applied too much of it at once, when I tried to sand it back down I damaged the colour layer, and in the end I had to sand the whole blue colour off and start all over again.
No worries, though, it actually looked better the second time around.
Attaching the neck
Since everything went more or less fine so far, I thought it would be time to finally do the most important step: liming the neck into its pocket.
The neck actually fitted very well in there already “out of the box” so I only sanded both surfaces with the help of a sanding block, so they are perfectly even and touch at a maximum surface.
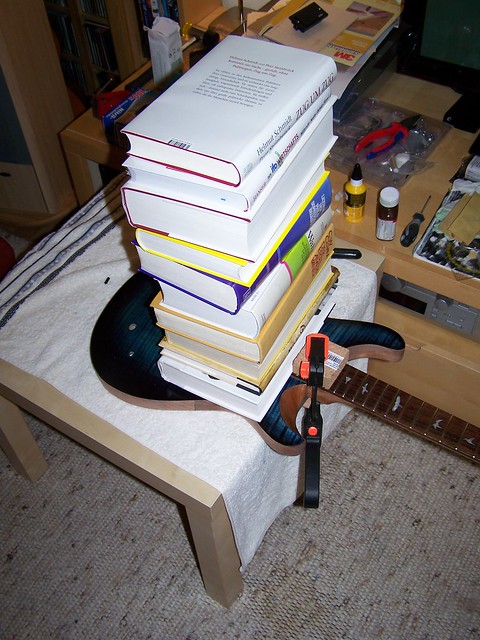
Then comes the moment of truth: wood lime goes into the pocket, spread a bit and the neck goes in. Then a vice to press both sides together. Then the second one … and disaster strikes: the second vice breaks and I don’t have another one in an appropriate size.
Since the joint will only hold properly if there is enough pressure applied now, and since this is the place which has to withstand the entire tension of the strings, some improvisation was necessary:
After 24 hours, it was time to test the result by putting some strings on it:
Looking at the head, you can now see the brand new (locking) tuners and also the nut, which still needs a bit of work to adjust it exactly to the neck here.
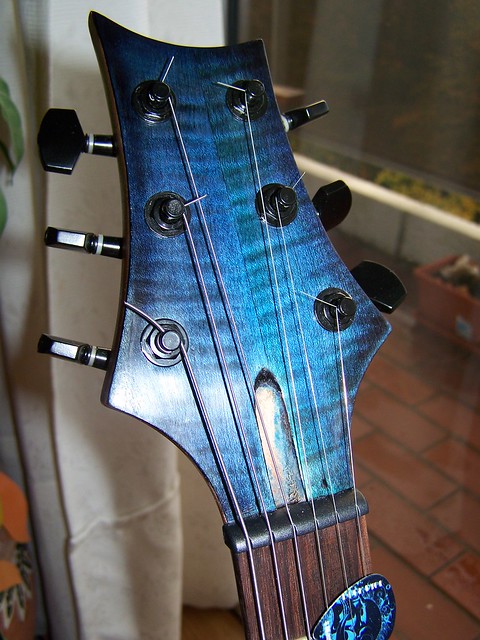
You will notice that I decided to set the tuners at a different angle than what you will see on PRS guitars (which I find a bit boring and uninspired in this aspect).
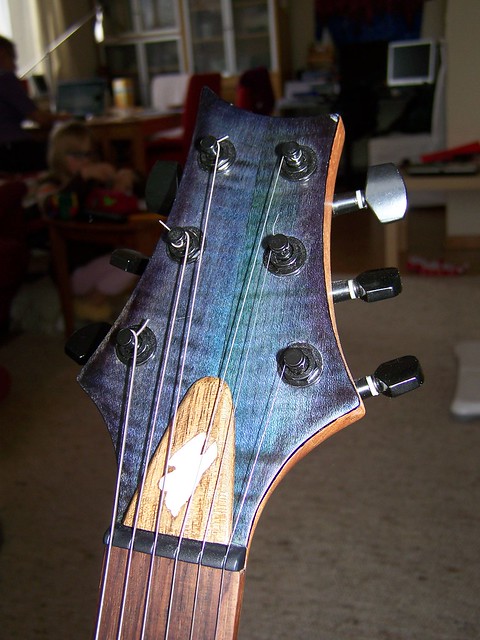
This is also the point where the picture of the magnets in the head fits, even though in real time I placed them there much later (as you can see by the now adjusted nut):
The magnets were fixed with a tiny bit of super glue. Of course I placed one of them the wrong way around so instead of attracting it actually repelled it. I noticed after glueing only so it was easier to turn the magnet in the cover around, but in the end this type of attachment turned out to be really very elegant and easy to do.
This is how the head looks completed:
In hindsight, the walnut of the trussrod-cover doesn’t harmonize too well with the rosewood of the fretboard and the mahoganay of the neck, but, well, now it’s done…
Electric
As you remember, we are building an electric guitar, so it is time to think about the electric trick:
I spent quite a lot of time trying out different options for the electric: different circuits, different possibilities, different pickups, etc. All in all, I spent probably more money into the electrical parts alone than a cheap guitar was worth. However, in the end I settled for a very simple circuit and the following PUs:
- On the neck position: a “G&B” humbucker that I got used (cheap) from a music store. This is the same kind that PRS is also using for its “SE” series, and it has a warm, full and very present characteristic in its sound.
- On the bridge position, a Warman G-Rails tripple-humbucker. It’s really three separate single-coil PUs, but I just use them in series, as a tripple-humbucker. It has a rather “sharp”, powerful presence.
Together they offer all the possibilities I could wish for. My earlier idea to add an “out-of-phase”-switch was abandoned when I noticed that this doesn’t work very well with two such different PUs.
Here’s how they look like:

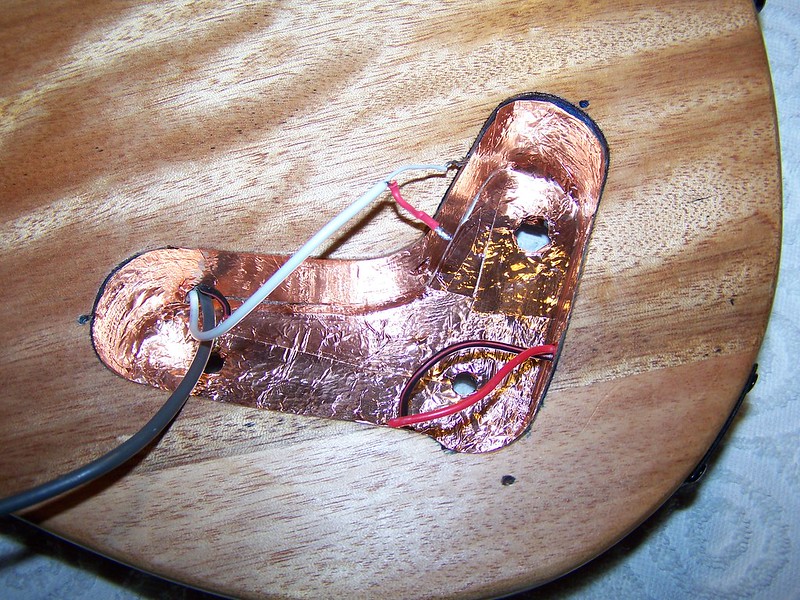
But first things first: the cavity for electrics should be wallpapered with EMS film, before you do anything with it: